AIX LVM – Creating VG, LV and File System – Part1
In detail, practical information about creation a volume group, logical volume and file system. In many projects they used to provide physical partition size and usages of the file system if not based on experience UNIX administrator used to create a file system.
STEP 1 :- Check available free disk on the system by using lspv command. As per our plan hdisk0 is a free disk we can use that disk to create a volume group.

STEP 2:- Check the active volume group in your system by running lsvg –o command, this is to check the existing volume group name in order to avoid duplicate name. However, volume group cannot be created with an existing volume group name.

STEP 3:- Create a volume group by using mkvg command along with the switches.

y —— Stands for volume group name ( Con_vg is the volume group name)
s —— Stands for physical partition size (512 is each physical partition size)
hdisk0 —– is an actual disk has been used to create a volume group.
After entering the command we could see some errors, there is a possibility this hdisk0 would have been used for any other purpose which is not being formatted and assigned to your server. As an OS admin you have ensure that this is not part of any volume group or any other character device is associated along with it. You can check this stuff in /dev/ directory.
STEP 4:- The above said stuff has been validated and hdisk0 is not part of any volume group and it does not have any character device associated along with. It’s clear is that, we can use force option to add a physical volume in to volume group.

**** If we haven’t given any option such that –B,-S option mkvg command creates by default normal volume group.
STEP 5:- We can check the newly created volume group through lsvg –o command and validated through lspv command shows hdidk0 is part of Con_vg.


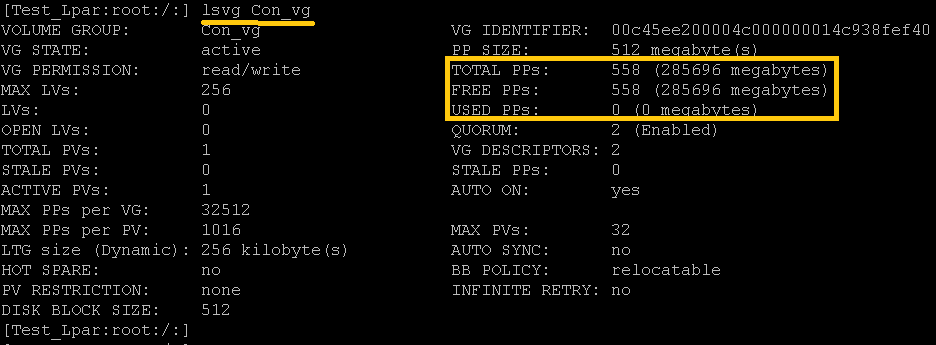
STEP 6:- Check the attributes of Con_vg volume group by using lsvg command
Syntax :- lsvg <Volume group name >
STEP 7:- Create logical volume ( lv ) from Con_vg and the size of 10 GB ( in the below command at the end 20 has been given which indicates that 20 PP and Con_vg each PP size is 512 MB ) by using mklv command
 y —– Logical Volume name
t —— Type of the logical volume
STEP 8:- Check the newly created Logical Volume through lsvg –l <volume group name>

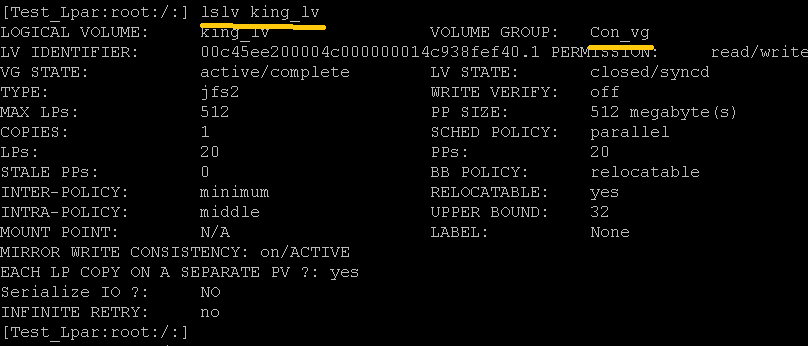
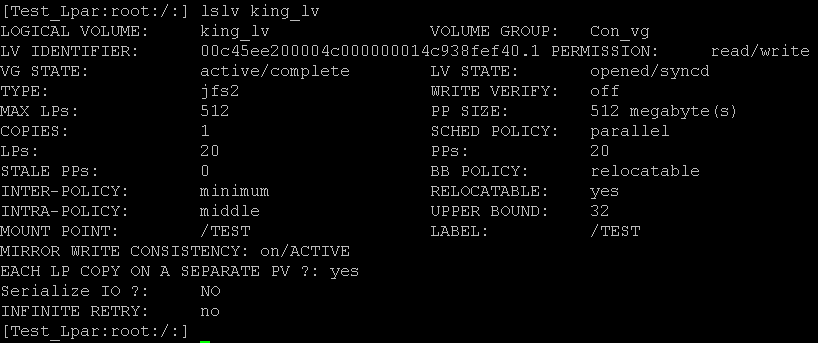
STEP 9:- Check the Logical Volume attributes through lslv <Logical Volume Name >
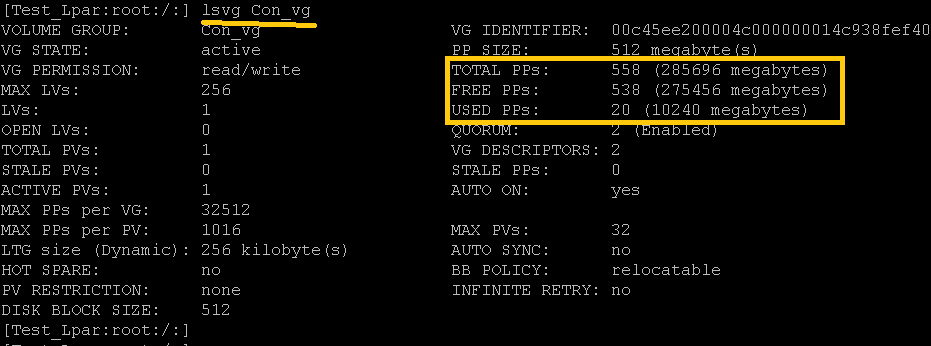
STEP 10:- Check the volume group in order to validate the allocation.
STEP 11:- Check the existing mount points in your system.
STEP 12:- Create a file system by using a newly created logical volume. Crfs is the syntax for creating a file system.

v —— Type or version of file system
d —— Device name or logical volume name
m —– Mount point or file system name
A —— Auto mount is yes , after server restart FS automatically mounts
p ——- Permission is read and write
STEP 13:- Check the created file system through lsvg –l <vgname> , the status would be as closed syncd.

STEP 14:- Mount the File system through mount <File system name >

STEP 15:- After mount now the mount point is ready for read write operation.

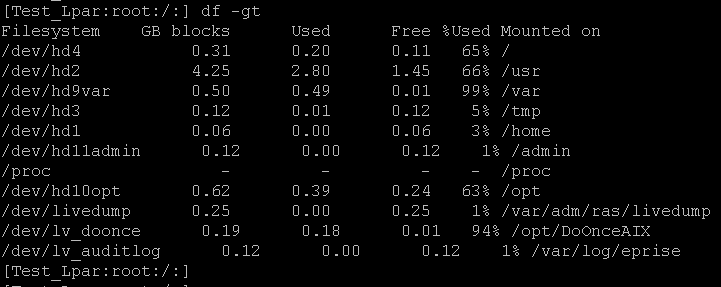
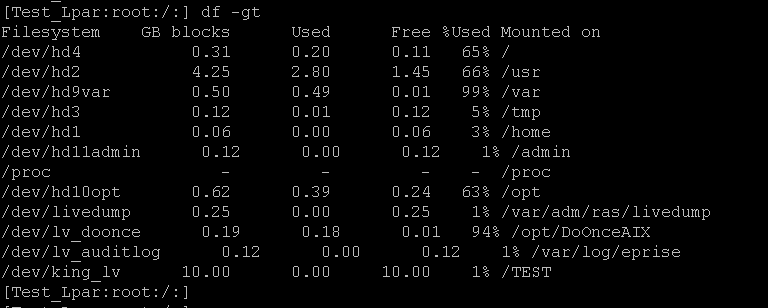
SETP 16:- After mount you can validate through df –g command, this FS entry would have been added automatically in to /etc/filesystems file.
STEP 17:- If you could check the attribute of the lv you could see the LABEL name appears as /TEST , you could not find that before mounting the FS.
AIX File system creation has been done; we can see how to add and reduce and some practical challenges in forth coming articles.